Introduction
Airbrush clogging is a problem I have had since returning to modelling, and deciding to look to do custom paint jobs on some I have returned to using my airbrush. Airbrushes have, in my opinion, many advantages with traditional brush painting. Don’t get me wrong, there are still parts that I favour brush painting for. However, if you want to get good smooth coverage, and beautiful blends an airbrush really is outstanding.
The setup
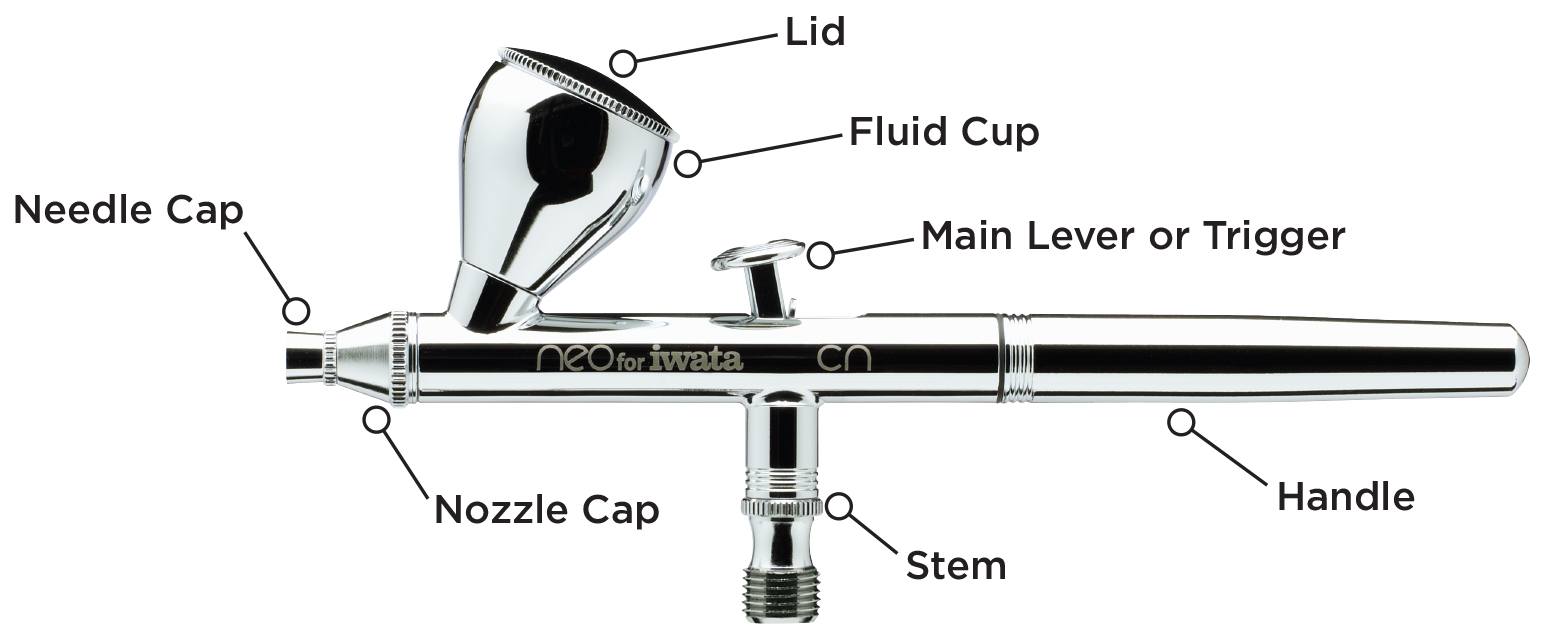
Now fortunately for me, I still had my original airbrush compressor and tank. It does, I admit require new feet, but on the whole it works. The brush itself is an Iwata Neo that I picked up a few months ago. I do have some cheaper brushes that I may use for more general base coats etc.
The problem
So as the title would suggest I have been having major issues with my airbrush clogging. On the whole this happens most when trying to do the base coating on the parts. I decided to do some research on potential causes, and potential fixes.
Dirty Airbrush
So the first thing I came across was that the airbrush itself could be dirty. In as much that if there is old paint / paint particles / chunks in the airbrush that haven’t been cleaned out they could cause it to clog.
The solution to this one is pretty simple. Strip the airbrush down and thoroughly clean. If there are manufacturers instructions on cleaning the airbrush then follow those. If not there are loads of youtube tutorials on cleaning airbrushes. This one for example goes through it in quite a lot of detail.
Damaged Needle
So a good way to check the needle is to remove it from the airbrush, then draw it backwards through a piece of tissue paper. If you feel any snagging or catching you potentially have a bent tip. At that point replacing the needle is really your only option.
Paint Viscosity
Basically this is how watery / flowy the paint is. On the whole the advice I got on the forums was you want your primer to flow with the consistency of milk. If the paint is to thick then it can clog the airbrush and give you real issues. At this point you are going to want to tip out any remaining paint, and start trying to clean it with airbrush cleaner. I’ll often try and get it to back flow to shift anything stuck back into the cleaner to help dissolve it.
If you don’t know what back flow is you cover the end of the airbrush with your finger (please ensure the needle cap is on) and then activate the airbrush as if you were going to spray a little paint. The air is forced back and into the paint pot. If you have cleaner or water or paint in there it will bubble a little. Do this a few times, then empty the pot and clean again and test spraying. If you really can’t get it to unblock then do a total strip and clean of the airbrush.
Time
In essence as soon as you have put that paint into the pot it is going to start to dry. Dried paint makes bits which can clog the airbrush. Don’t put too much paint in the pot and feel free to give it a rinse through every few minutes to keep it clear and working properly.
Dry Tip
This is quite a simple one. The paint is being blown out the end of your airbrush. When this happens some of it will dry, teeny tiny bits. The longer you airbrush for, the more teeny tiny bits will stick eventually messing up the air flow and clogging the brush. One tip I found was to keep a small bit of sponge to hand soaked in water or cleaner or the like, and every couple of minutes or so give the tip a clean. Essentially just keep removing those teeny tiny bits and keep the air flowing. The other side effect of not doing this is you may periodically get bits blown off the needle onto your work area ruining what you are painting.
Conclusion
For my personal journey I’m due to try again this weekend. Testing different things to try and alleviate my clogging issues. My advice for anyone having problems would be change 1 thing at a time. Eliminate it as a problem, then change the next. You want to know ultimately what fixed your problem. In all likelihood it will be a combination of things.
Airbrush clogging is without a doubt a frustration. But with time, practice and patience, I’m sure I’ll work it out, and I recon you can too!
Thank you for taking the time to read this. If you haven’t already done so please like and follow us on our social media platforms and checkout our website!
Facebook: https://www.facebook.com/profile.php?id=100086701512793
Instagram: https://www.instagram.com/modelkitsltd/
Website: https://modelkitsltd.co.uk