Posted on

Searching Bandai Spirits

Searching

Introduction

If you aren’t familiar with it (I know a lot of you are), Bandai Spirits is the main web site that covers the Bandai products. They normally have all the information on the various suits and kits, and can be a good starting point for finding out information. I have found that when trying to find information I often find it quicker to tweak the URL than to use the interface.

So what’s the problem?

Well if you read and write Japanese then there is probably no issue at all. However, if like me, you are not fluent then you are going to need some help navigating the site, and searching it.

Step 1 the Browser

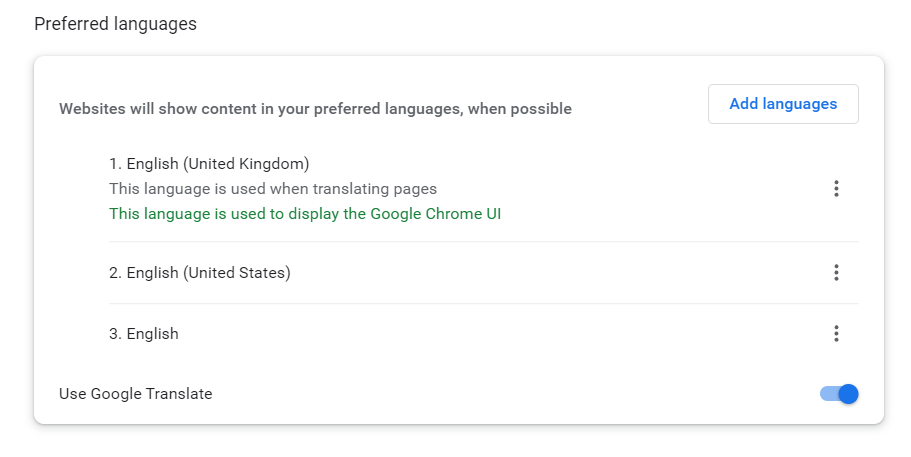
Step one is using your browser to help you. I use Chrome, but you can probably find similar options on other popular browsers. If you navigate to the Vertical ellipse in the top right corner, and then select settings you will get a popup with the settings window. Then select languages. In the preferred languages section make sure you have “Use Google Translate” turned on. Mine looks like this:

Language Settings
Language Settings

Next navigate to the Bandai Spirits products page, which you can find here. You should get the highlighted icon in your toolbar window, you may also be prompted by google translate to translate the page, so feel free to translate it at this stage.

Icons in browser tool bar
Icons in browser toolbar

Next you want to click the icon that is highlighted in the image above. This will popup a small menu with the option the “Always translate Japanese”. Tick this box. Now every time you visit the site it will automatically convert the pages to your language. This saves you having to click buttons every time. The popup should look like this:

Translate Popup
Translate Popup

Step 2 the Search

The search is quite powerful, however, I don’t find it as quick as tweaking the URL in the browser address bar.

A search string will look something like this:

https://www.bandaispirits.co.jp/products/result.php?search=true&freeword=hg&year_frm=2009&month_frm=&year_to=2009&month_to=&category=0&dsp_cnt=80&sort=salesdate&order=desc

So lets break this down.

SectionDescription
https://www.bandaispirits.co.jp/products/result.php?search=true&The first part of the URL. This won’t need to change.
freewordThe text to search for. The site searches content in Japanese, so either covert your text to Japanese or search for a generic term e.g.:
SD
BB
HG
RG
MG
PG
Valid Values:
Free Text.
year_frmStart date to search from. Entering year_frm=2000 returns all models from 2000 to the current day.
Valid Values:
4 digit number.
month_frmThe month (in the year specified above) to search for models from.
01, 02 etc. represent the months.
Valid Values:
2 digit number.
year_toEnd date to search for the model. Entering 2000 return only models before 2000.
Valid Values:
4 digit number.
month_toThe month (in the year specified above) to search for models before.
01, 02 etc. represent the months.
Valid Values:
2 digit number.
categoryLimits the search to only the category you are interested in.
Valid Values:
0 = Everything
1 = Gunpla
2 = Plastic Models (Including 30MM)
3 = Figures Metal Builds etc.
4 – Ichiban Kuji
5 = Prize / Banpresto
dsp_cntThe number of records to display on a page.
Valid Values:
20
40
80
sortControls whether the results are sorted by price or salesdate.
Works in conjunction with the order parameter below.
Valid Values:
price
salesdate
charaCharacter name to search for.
Valid Values:
Free text
orderControls the sort order for the results.
Works in conjunction with the sort parameter above.
Valid Values:
asc – Release date newest first
desc – Release date oldest first
URL Options

Why would I ever do this?

When I am searching for a model I will often find it easier to tweak the parameters in the URL rather than bothering with the interface. For example by combining the from and to years I can narrow down the date range for the model I am looking for.

When I am listing Bandai products on the site for sale (shop available here) I like to include a link to the original Bandai Spirits information. This gives the customer the option to go and read what Bandai themselves have said about the model. This in turn has led me to have to pick out how to refine my searches as sometimes it can be difficult to find some of them, and, for me at least, I find tweaking the URL quicker than using the page.

Conclusion

In conclusion this may be something you never need to use. However, it is another little insight into the things I end up doing to try and maintain the quality of the information on the site and the products. I want to try and make things as accurate as possible, and not have you clicking on a product and just seeing some bland one liner. It may take me longer, but for me at least, it is worth the extra effort.

Thank you for taking the time to read this. If you haven’t already done so please like and follow us on our social media platforms and checkout our website!

Facebook: https://www.facebook.com/profile.php?id=100086701512793
Instagram: https://www.instagram.com/modelkitsltd/
Website: https://modelkitsltd.co.uk

#gundam #gundammodel #model #kit #gunpla

Posted on

GUNPRIMER Products now in Stock!

GUNPRIMER_GateRemoverSet

Introduction

I am super happy to finally announce I have my first GUNPRIMER Products now in stock! I have to admit to being really hyped about these arriving! If you haven’t heard or seen the GUNPRIMER you can see their site here.

I have initially stocks the 4 things I thought may appeal to people initially.

Gate Remover Set Starter Kit

The first of these is the GUNPRIMER Gate Remover Set Starter Kit.

GUNPRIMER_GateRemoverSet

This set includes the Recover, the BALANCER (White) and RASER. You can find the product live on the shop now here! It really is a fantastic product. Everything from the presentation to the job these products do are absolutely fantastic. they are certainly, from my use of the BALANCERS, well worth the investment.

RASER PLUS

The second item I decided to stock initially was the RASER PLUS.

RASER 00
RASER Image 00

The RASER PLUS is designed as a heavy gate remover. So where there is more plastic left from the runner, to be able to quickly and efficiently clean that up, whilst leaving you with a beautiful looking piece at the end. You can find these on the shop here. The RASER PLUS is the next step up from the RASER that comes in the starter kit.

BALANCERS

For my third and forth items I decided to stock are the GRAY and WHITE BALANCERS. These are the products that introduced me to the GUNPRIMER range, and so blew me away I felt I needed to make them more available for everyone!

GRAY BALANCERS are used to remove scratches. I use them all the time now on my models and they work wonders. The White BALANCERS have two different sides. The Green preps the piece you want to re shine / polish. The White side then polishes it up. The end results can be absolutely awesome. You can find the GRAY BALANCERS in the shop here. You can find the WHITE BALANCERS in the shop here.

If you haven’t seen them or used the products I would highly recommend checking them out. Have a look at the videos and consider giving them a test. I absolutely love the products.

Thank you for taking the time to read this. If you haven’t already done so please like and follow us on our social media platforms and checkout our website!

Facebook: https://www.facebook.com/profile.php?id=100086701512793
Instagram: https://www.instagram.com/modelkitsltd/
Website: https://modelkitsltd.co.uk

#gundam #gundammodel #model #kit #gunpla

Posted on

ModelKitsLtd Shop and Stock

lfrith_2

Happy new year to everyone and welcome to my shop and stock update. I hope last year was filled with plenty of models to build, and I hope that this year brings plenty more models to build!

At https://modelkitsltd.co.uk/shop I am constantly looking to bring in more stock and broaden the selection of products that we have available in the UK ready to ship.

My next order is due to be delivered by UPS on Wednesday the 4th of January 2023. Some of the items on the list have already been reserved for customers. So for example the Lfrith models I have coming in are already spoken for! However, there are plenty of other models coming into stock. In fact, I have 34 new products coming in!

Lfrith Kneeling
Lfrith Kneeling

If there is anything you are after specifically let me know and we can have a look at what is available and my unique pre-order no pre-order methodology.

If that isn’t enough to whet your appetite I also have the Gunprimer stock I ordered coming in hopefully this week also. You can see the full range of their stock here. If they have something you are interested in that I don’t have in stock please just let me know. I am more than happy to add specific items to my inventory if they are wanted by people. I will do some posts with the products once they are here and I have the opportunity to add them to the store.

Thank you for taking the time to read this. If you haven’t already done so please like and follow us on our social media platforms and checkout our website!

Facebook: https://www.facebook.com/profile.php?id=100086701512793
Instagram: https://www.instagram.com/modelkitsltd/
Website: https://modelkitsltd.co.uk

#gundam #gundammodel #model #kit #gunpla

Posted on

Entry Grade (EG) Model Options

EG_Nu

I mentioned in my earlier posts that I have a re-stock of some Entry Grade (EG) models coming in. I thought I would go through some of the things that are possible with these models. There are so many model options with these I think they are sometimes overlooked.

Firstly I think for the money they are awesome models. They have less detail than the other grades, but the ease of the snap fit, coupled with the details they do have make them look awesome. They will never reach the heady heights of the detail or joint articulation of the other lines, but they are fantastic standalone models.

Secondly looking at the EG Nu model it already looks like it has stepped out of one of the shows. It could literally have just taken a leap out of the screen and into the room.

Thirdly I love the idea of the EG models for younger builders who, possibly, have a shorter attention span, and who want to see something appear sooner rather than later. I think they would very quickly go from plastic bits on a runner to a model they made themselves that they can be proud of.

Fourthly for those parental figures out there it offers a wonderful opportunity to bond with your young ones, while they are also getting to practice finer motor skills which will be useful in all walks of life.

Fifthly for those who just want them themselves there are so many options available with these models. Take the EG Nu model as a great example.

EG_Nu
EG_Nu

Starting with the panels, looking at this model it offers ample opportunity to learn scribing. There are large panels all over this piece from the shield to the chest and the front flaps and legs. Even the calf muscles look like they really want you to learn scribing using them!

Panel lining is another effect that you could practice on this model. Although I will admit looking at it, you may want to practice scribing first to add a few more bits to panel line 🙂 However, if you are looking to hone your skills this is a great place to start.

I also think this is a great proving ground for painting, and painting styles. Looking at the chest and hips section I think they are so close to many other models that this provides a perfect generic model to test some paint schemes on. You can also practice shading techniques and blending and all other sorts of effects.

Lighting … well ok I need to see inside one to see how hard, or easy, it would be to light this up; I am thinking primarily on the eyes.

After market panels, and hatches. I think this is also the perfect model to try out some after market hatches and panels.

Now you may be thinking, but if I buy all those things and do all that wouldn’t I be better just buying a more detailed model to start with? I would say do both! Customising the models offers you the opportunity to make something totally unique to you. The panels will be where you want, the lines where you want, it has the chance to be exactly as you picture it in your minds eye.

Now obviously none of those things may appeal to you. However, at the end of the day it is all about doing what you enjoy. This should be a hobby, and be enjoyable. Never let anyone tell you that you are having fun “wrong”. If you want mismatched colours, you go for it. If you want one leg longer than the other, then go for it. Whatever makes you happy with your model is what you should go for. I don’t think it matters whether you customise or not, as long as you enjoy what you are doing.

Thank you for taking the time to read this. If you haven’t already done so please like and follow us on our social media platforms and checkout our website!

Facebook: https://www.facebook.com/profile.php?id=100086701512793
Instagram: https://www.instagram.com/modelkitsltd/
Website: https://modelkitsltd.co.uk

#gundam #gundammodel #model #kit #gunpla

Posted on

Christmas Kits 2022 and Toys

EG_Nu

Christmas has been and gone. Hopefully people got kits, toys, and modelling supplies. I know there is nothing quite like making sure your backlog has some height to it!

If you haven’t got anything over the last week fear not! I have plenty of kits in stock with more coming and being listed from Friday. As well as that I will be hopefully getting more in January so stay tuned to see what I get from that list!

If you haven’t been to the shop have a look, you can get there here. There are some really nice kits in stock, and some nice kits coming in.

I have also had the update from Gunprimer that my package has been posted and I believe is currently in flight on the way to me! If you missed that post I did a quick mention on it here. I am super excited to get those in as they work amazing, and look amazing.

As well as some Real Grade (RG) kits coming in, I also have a restock of Entry Grade kits which are awesome for so many reasons, from their price point, to what you can do with them on the customisation front.

EG_Nu
EG Nu

The above model for example is an Entry Grade Nu figure originally released in 2022. You can see more about it on the Bandai Spirits page here. This would be a perfect model to practice your weathering or battle damage techniques on. I also think you would be able to test out making your own templates to replace the shoulder and shield stickers with something painted directly on to blend better with the model.

Thank you for taking the time to read this. If you haven’t already done so please like and follow us on our social media platforms and checkout our website!

Facebook: https://www.facebook.com/profile.php?id=100086701512793
Instagram: https://www.instagram.com/modelkitsltd/
Website: https://modelkitsltd.co.uk

#gundam #gundammodel #model #kit #gunpla

Posted on

New Tools Coming – Gunprimer products

GATE-REMOVER-SET-Starter-Kit

I am excited to let you know that in the new year I will be receiving stock of some of the Gunprimer products. It was amazing when I first saw them; their website (here) has great information on the products.

I was introduced to the Gunprimer products by a friend of mine who highly recommended them to me. After seeing the results from the photos they sent me I was impressed. They then, very kindly, gifted me a set. I was so absolutely stoked by the results these give that I contacted the manufacturer. I have been set up as a wholesaler, and put in, and paid for, my first order.

In the early part of next year I will be adding the following products to the online store:

I had, much to my shame, never heard of these products. They are however, absolutely stunning. They aid in the cleaning up of the model with respect to where you would have nub marks, and also help to restore the shine back to the plastic making it look as it nothing ever happened there.

I will cover the products in more detail in further posts along with examples of how they work, and how effective they are. If you haven’t tried them they are, honestly a game changer.

If you want to know more about these, or the availability and/or pricing please feel free to reach out to me.

Thank you for taking the time to read this. If you haven’t already done so please like and follow us on our social media platforms and checkout our website!

Facebook: https://www.facebook.com/profile.php?id=100086701512793
Instagram: https://www.instagram.com/modelkitsltd/
Website: https://modelkitsltd.co.uk

#gundam #gundammodel #model #kit #gunpla

Posted on

Gunpla Decals

presson

Introduction

I learnt a lot in the last 24 hours about GunPla Decals. I was aware of a few things coming out the gate. However, before going any further you may be asking yourself what actually is a “decal”. A decal is a design placed on a medium that allows you to transfer it onto another surface. Think like those crappy fake tattoos you could get as a kid, but way cooler, and way better looking on your models.

What I knew so far

I knew that various kits come with different options or levels of decals. In fact one of the things when originally reading around GunPla was that the Ver Ka. kits often come with a lot of decals. From working with the various kits I have, so far, I’ve always shied away from the decals on the whole. I would tend to use the one for the visor if it is say a shiny silver or something that sits behind a clear visor. However, on the whole I avoided them till I decided to try and work with my MG Heavy Arms.

I found myself bamboozled about the different types I had.

Images

The previous ones I had received in a kit had a shiny silver backing and were, quite obviously stickers. However, the translucence of both of these threw me. After speaking to some wonderful people online in the UKGunpla group (you can find it here), I discovered that the ones on the right are stickers, and the ones on the left are press on decals.

Application

Now I’m sure everyone has their own method for working with these so I’ll just outline what I did.

Firstly, you will find the “map” for the decals placements in the manual for the model. I also found using my magnifying glass meant I wasn’t constantly straining. Secondly as a lot of these go into nooks and crannies and corners, you will potentially benefit from taking apart some of the kit to make it easier to work with them and apply the decals. Thirdly, do not rush; a badly applied decal will make the kit look terrible.

First up were the sticker decals (Type 2 Decals in the image above). I used the tip of a stanley knife to gently lift the sticker off the backing (I also found that with multiple stickers in close proximity I would often have to hold down the next sticker to avoid lifting two). Next I would then position the sticker above where I wanted it to go on the model based on the map from the instruction manual, then gently place it down, using my thumb to apply pressure to the sticker against the part and sliding the knife blade out from under it.

Second up were the press on decals (Type 1 Decals in the image above). For these I ensured there was a piece of foam board underneath to be safe. I then used the stanley knife to cut out a specific decal. I then freed 3 sides of the cut out before laying a piece of masking tape over the top and using that to lift it. Note that the masking tape is thin enough to see the decal underneath/through it. I then placed it on the part where I wanted the decal to reside and rubbed it apply a gentle pressure using the flat end of my tweezers. Then when lifting the masking tape the decal is left in place, and the plastic it was adhered to lifts with the masking tape.

Conclusion

I still have some work to do on this, and I know that I need to also work through the weapons and build them up. However, I am, very happy with the results.

Thank you for taking the time to read this. If you haven’t already done so please like and follow us on our social media platforms and checkout our website!

Facebook: https://www.facebook.com/profile.php?id=100086701512793
Instagram: https://www.instagram.com/modelkitsltd/
Website: https://modelkitsltd.co.uk

#gundam #gundammodel #model #kit #gunpla

Posted on

Incoming Stock – RG God Gundam

RG_God_02

Introduction

So with my next shipment listed by UPS it should be looking to head over this way in the next week. I am assuming it will arrive after Christmas. However, continuing on updating people, and showcasing what is coming in, today we have the RG God Gundam 1/144.

The RG God Gundam was released in 2022. This model incorporates a lot of the latest features and enhancements that Bandai have worked on. This includes enhanced joints that allow it to strike the arms crossed pose.

Images

I absolutely love the way that the new joints allow you to pose this model. Checkout these images from the Bandai Spirits page.

More Information

I found the original Bandai Spirits information here. Reading through that information it is obvious that Bandai have spent a lot of time recreating more realistic movements in this model. I certainly would love to build it and see how it holds up to the other models.

I should have, all being well, two of these coming in to stock when my next shipment arrives. So if this is something you are looking for keep checking the store as it will be on there soon!

If you haven’t already built an RG model then this, from the looks of all the information and enhancements Bandai have made, looks like it would be an absolutely stunning model to put together.

If you are interested in reading up more on this the Bandai Spirits page is linked above, and there is also a load of information on the Gundam Fandom Wiki page you can find here.

Conclusion

Thank you for taking the time to read this. If you haven’t already done so please like and follow us on our social media platforms and checkout our website!

Facebook: https://www.facebook.com/profile.php?id=100086701512793
Instagram: https://www.instagram.com/modelkitsltd/
Website: https://modelkitsltd.co.uk

#gundam #gundammodel #model #kit #gunpla

Posted on

Incoming Stock – PG 1/60 RX-0 Unicorn

Unicorn_3

Introduction

One of the products I will be getting into stock is the PG 1/60 RX-0 Unicorn. With them being so hard to get I only managed to source 1 of them this time round but I will continue working on trying to get more in stock.

For anyone new to the hobby PG is short for Perfect Grade and is Bandai’s top tier of models. They are traditionally the largest (physically) as well as having more parts and details than other models in other grades.

Images

Information / Overview

The kit was originally released around December 2014, and although you need to purchase it separately, there is also a lighting kit that can be used with this kit.

I always like to read up around the kits, and the history on them and any other available information. I found the original Bandai Spirits page here, although I had to run it through google translate!

Amongst its features this model boasts

  • The ability to transform between unicorn mode and destroy mode (including the deployment of the face guard).
  • The resin for the red elements of the frame/suit are specifically designed to improve the look of the model
  • The blade antenna that opens and closes during “transformation” has a magnet inserted to reproduce the single horn in unicorn mode. 
  • The inner surface exposed in destroy mode is already coloured with gold.
  • A variety of weapons are included, including Beam Magnum, Hyper Bazooka, and Beam Gatling Gun.
  • Dedicated display base included. 

If you would like to read more about the suit and the history surrounding it another great resource is gundam.fandom.com and you can find the Unicorn information here.

I can’t wait to get this into stock and I have to admit I want to see the size of the box! I will, as always update people as I find out more.

Conclusion

Thank you for taking the time to read this. If you haven’t already done so please like and follow us on our social media platforms and checkout our website!

Facebook: https://www.facebook.com/profile.php?id=100086701512793
Instagram: https://www.instagram.com/modelkitsltd/
Website: https://modelkitsltd.co.uk

#gundam #gundammodel #model #kit #gunpla

Posted on

Broken Part – Pinning

Introduction

I will be honest. I wasn’t expecting to be posting about my ZAKU II any time soon. I have been doing some work to finish it off. Again, in my hamfisted manner I managed to break a part. I have no idea what was going through my head. However, I did thankfully have the presence of mind to not panic. The part pictured below should not come away from the model. Note this was by no means a fault with the model, and totally a user headspace error.

Broken leg part
Broken leg part

What to do?

I decided that probably the best way to try and repair this would be to pin the piece. For anyone who does not know here is my understanding of pinning. Other people may have different definitions but this is what I am going for. In essence you drill a small hole in your piece that has come off, and into where you want to mount it. You then trim a pin to size and glue it all back together. The pin helps to take the load and strengthen the join.

Equipment

Thankfully I have the four things I needed to hand. A small drill, a pin, some nippers and some glue.

As you can see I used a good old pair of nippers so as to not ruin the good pair I have. I find it is always handy to have a slightly older pair around for just these occasions. I don’t have a photo of the glue but for reference I was using Gorilla clear glue.

Method

  • Drill a hole through the broken off piece.
  • Align the broken piece with the model with the drill bit still in. Then continue to drill so the lines are aligned. (Be careful not to drill too far and go all the way through!
  • Using the nippers trim the pin to size.
  • Glue the pin into the model.
  • Once dry, add more glue to the pin and push the broken piece into place.

The last pieces (gluing the pin in and into place) can be done all the same time if you prefer.

Then leave your glue to cure and away you go.

Conclusion

Every time I do something like this I promise myself to be more careful next time. However, it was a useful opportunity to remind myself that pinning can be an invaluable technique in repairing a model, or in helping joints or pieces that join together with quite a small surface/join area.

Thank you for taking the time to read this. If you haven’t already done so please like and follow us on our social media platforms and checkout our website!

Facebook: https://www.facebook.com/profile.php?id=100086701512793
Instagram: https://www.instagram.com/modelkitsltd/
Website: https://modelkitsltd.co.uk

#gundam #gundammodel #model #kit #gunpla